
How to Send Registered Mail
By now you may have seen references to Registered Mail here and there, and wondered how to use it with your recorded documents. This guide will help you understand how Registered Mail (not Certified Mail) works and provide everything you need to use it with confidence.
Supplies
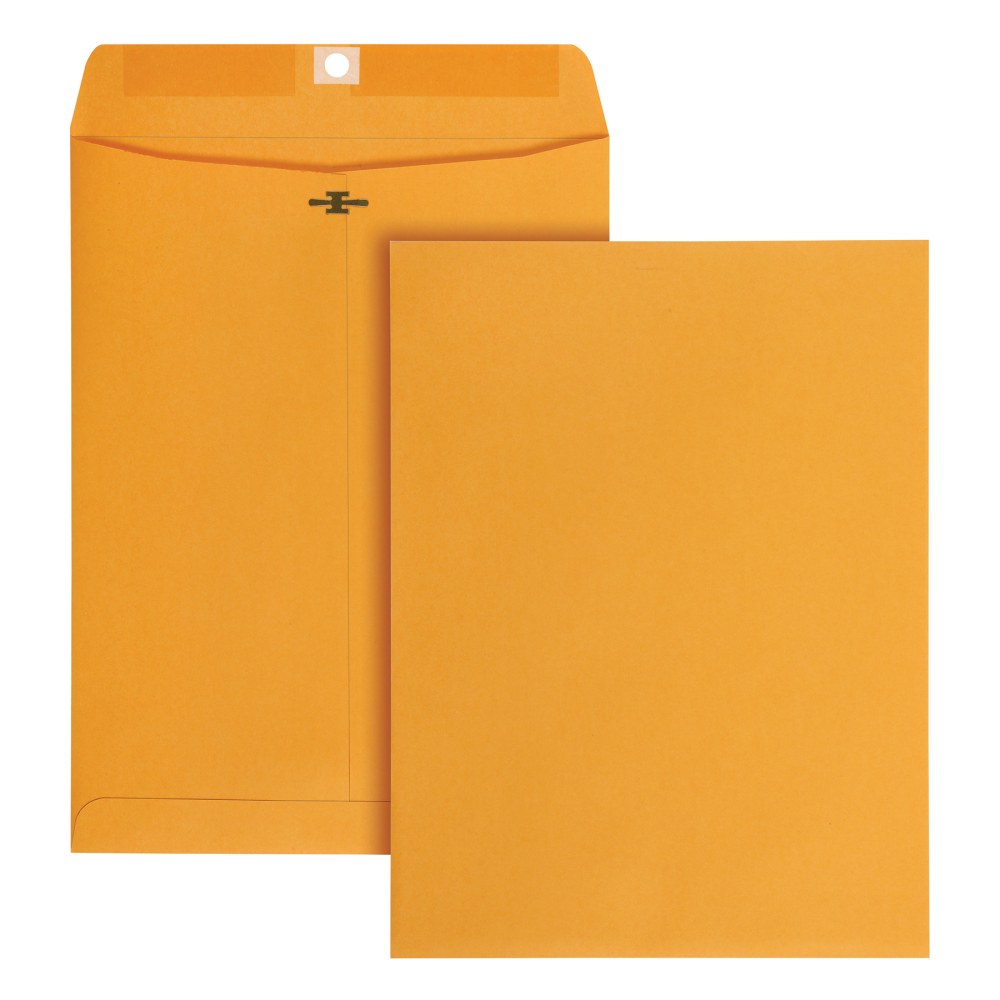
Many of these items can be purchased on the USPS online store for free. Payment is made when you bring them in to the post office to use them. It is recommended to buy the stamps online, because they may not have what you need at your local post office. The instructions below feature the 9-1/2 x 12-1/2 Priority Flat Rate Envelope, but if you are not in a time crunch, a Manila Envelope will work just as well and the postage is cheaper.
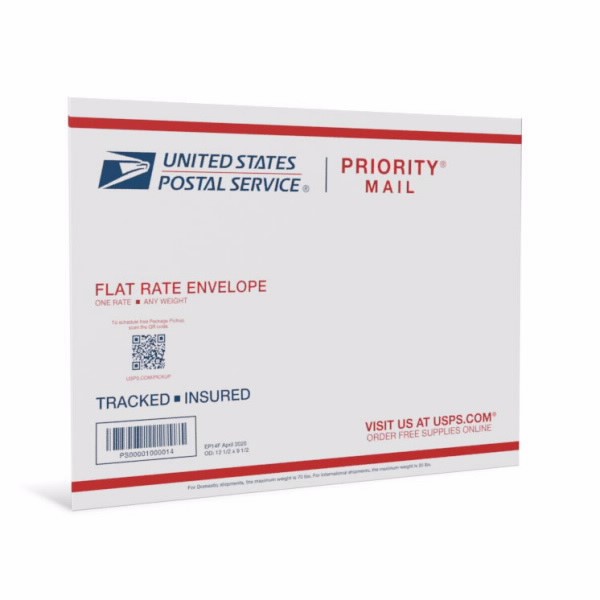
Envelope EP14F Priority Mail Flat Rate – single or pack of 10
Recommended for faster delivery, or larger groups of documents (20+ pages) which are too heavy for a 9×12 manila envelope.


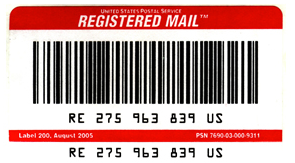
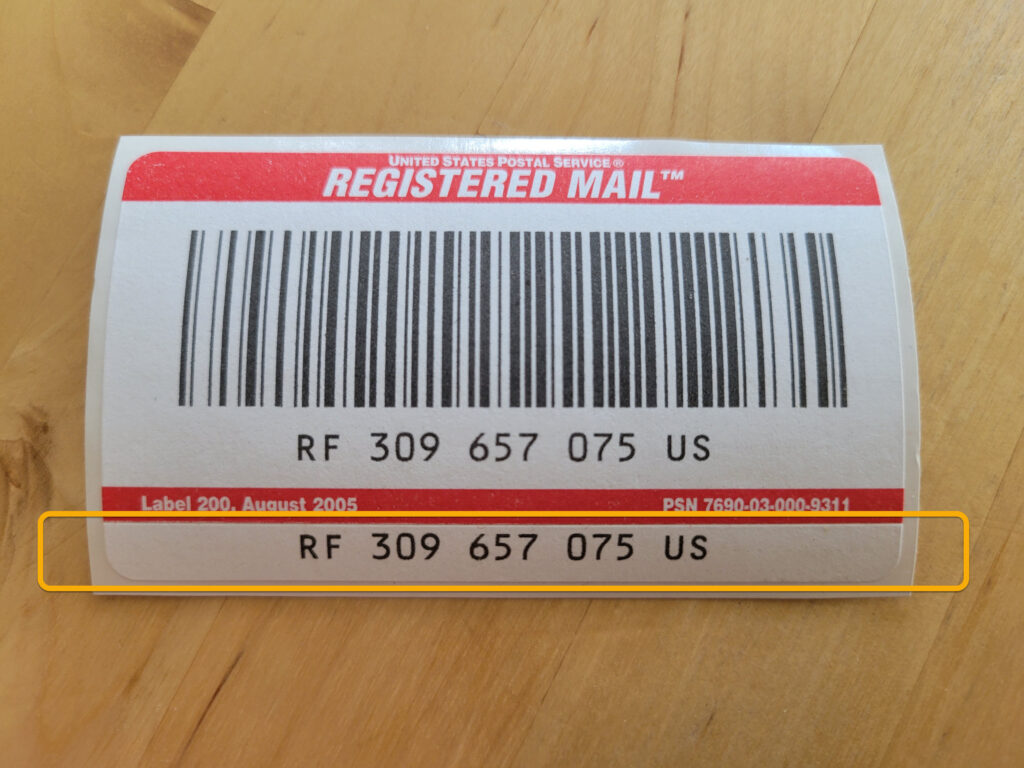
Registered Mail Label 200 – request these in person at your local Post Office
(Not to be confused with the 200N label, which has no bar code.) Ask for 10 at a time; if they refuse, simply go ask another Post Office.
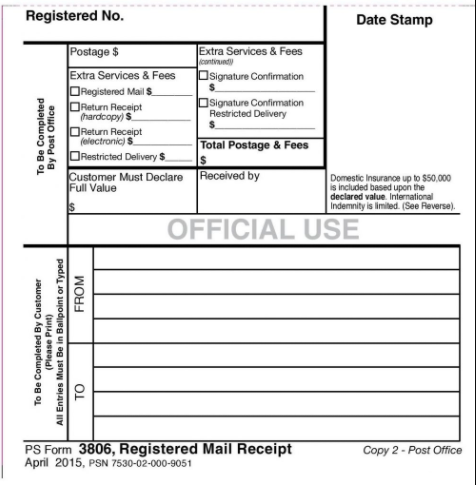
Registered Mail Receipt – Form 3806 – request these in person at your local Post Office
Printing the Registered Mail # in your Letter
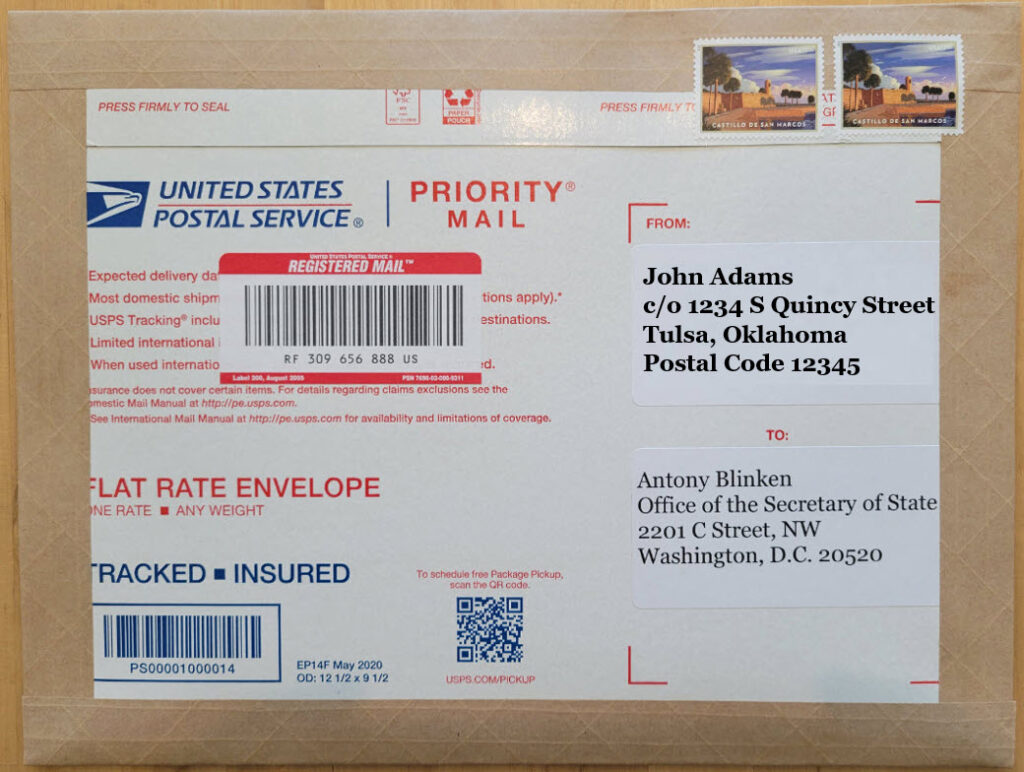
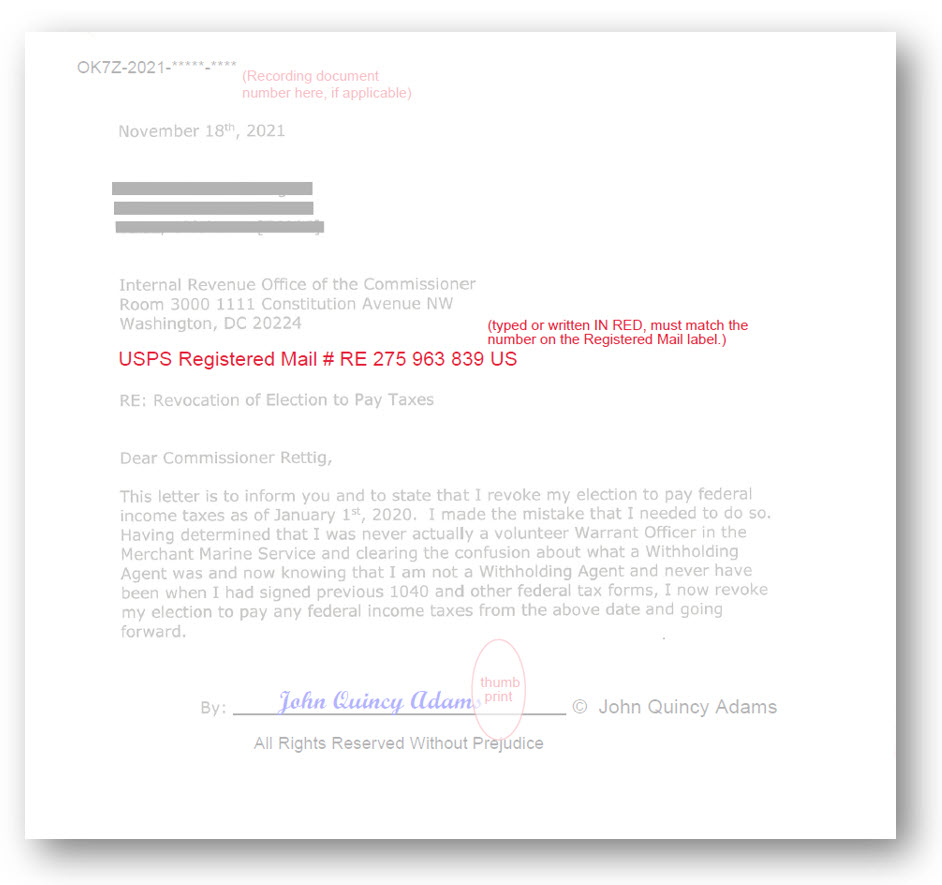
If you want “prima facie” evidence written into your letter which connects it with the chain of custody via Registered Mail – IRS revocation letters for example – then include the Registered Mail # from your label, near the top of the letter, in RED. Red is for living men & women domiciled on the Land & Soil. Including the Registered Mail number on the actual letter tells the recipient that the letter they are reading is also evidence connected with the chain of custody of the Registered Mail process. This rebuts any excuses that the recipient could make that they “never received the letter”. If you are unable to secure Registered Mail labels from your Post Office, then printing the number by hand into your letter will accomplish the same effect.
Here’s a tip. If in doubt, send something registered mail to yourself just to test out the whole process. Then when it comes time to mail important correspondence, you’ll be an old hand at this.
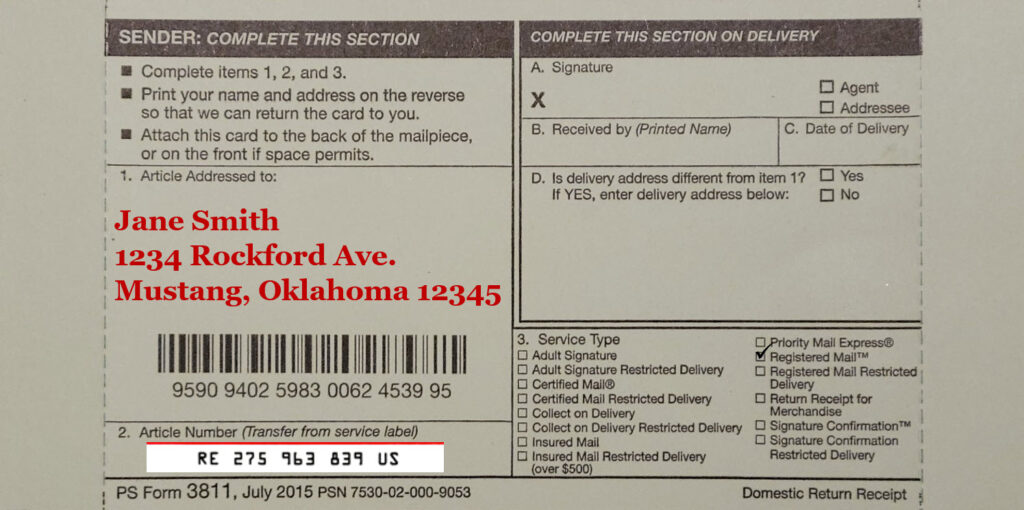
Green Return Receipt, Form 3811
Front Side
FIELD #1, “Article Addressed to:” Write in the recipient’s address or use a pre-printed address label.
FIELD #2: Using the Registered Mail label, remove the bottom strip of the sticker and apply it inside field #2, “Article Number (transfer from service label)”. You may need to use scissors to cut off strip on either end.
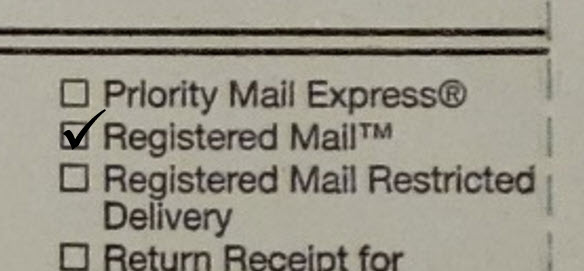
FIELD #3 – Service Type: remember to check the box for Registered Mail:
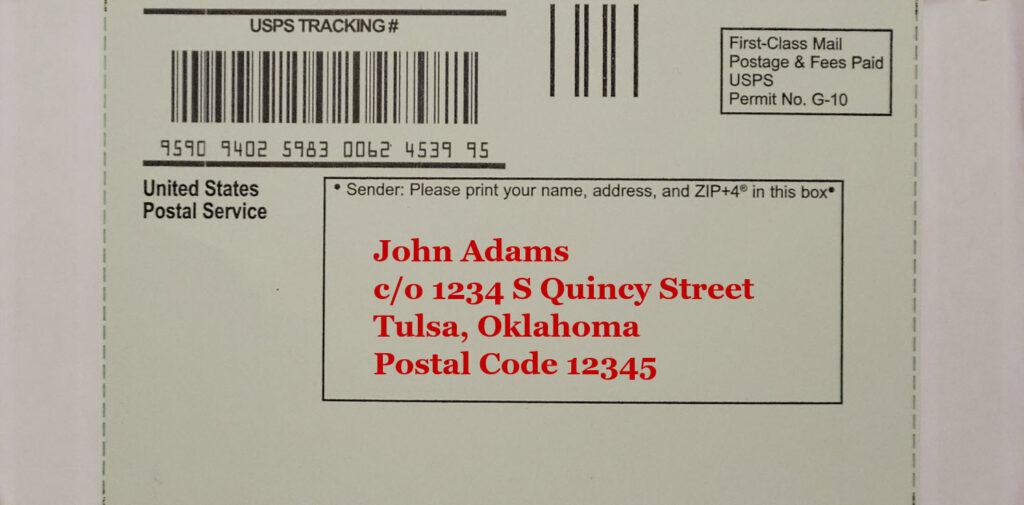
Back Side
- Write in your address – printed labels are recommended for small spaces – being careful to use your c/o address and the “Postal Code 12345” as the last line.
- Peel the plastic strips off the adhesive on both ends, without creasing or tearing the perforations.
- Apply the Return Receipt to the envelope as shown.
Putting It All Together

Tips
- When mailing important documents, do not fold or staple your letters – this rule of thumb is important when sending any communication to the IRS, in order to avoid any presumptions they may make at your expense. Place the unfolded 8 ½” x 11” document in the a 9″ x 12″ envelope.
- Mail is considered prima facie evidence; meaning it is “sufficient to establish a fact or raise a presumption…” Because of this, it is important to use the registered mail system correctly. If not used correctly, someone in the Sea jurisdiction may try to use your mistake in their favor as prima facie evidence that you are not in the Land & Soil jurisdiction which you claim to be. See Communicating with the de facto at 21:10, by Erin O’Donnell with the Ohio Assembly.
- Always use the “c/o” symbol before your address, which means “in care of”.
- It is advisable to purchase all your stamps online. Do not rely on your local Post Office to have the stamps that you need.
- Registered mail needs to have the seams taped with water activated Kraft Tape – either by you or a postal worker.
- If in doubt:
- Use the water activated Kraft Tape roll, and tape up the seams on your Registered Mail envelope before applying the Registered Mail label or the Green Return Receipt. This will ensure there is still room to apply the stickers.
- You can also wait until working with the Post Office clerk at the counter before applying the Registered Mail Label or the green Return Receipt. This way if anything does not go according to plan then you’ll have options.
- According to USPS codes, once an envelope has a Registered Mail label applied to it, it cannot leave the Post Office; it is now in their custody. If you are not sure, wait until the last minute to apply that Registered Mail label.
- Once you get the hang of it, you’ll be able to simply deliver your Registered Mail to the counter all ready to go, and maybe just check that you got the postage correct.
- If in doubt:
- In 2020 it was advised to place your home address zip code in brackets, like so: [12345]. Now the TASA Federation is advising that State Nationals instead place the zip code in the line below the City & State, and write ” Postal Code 12345 “. Both are methods to provide the USPS with the information they need to deliver your letter expediently, without giving the de facto government “prima facie evidence” to presume that you are voluntarily entering into a “contract” by admitting that you reside in a de facto zip code. **
- Use stamps only. If unsure, bring extra stamps with you to the Post Office. Do not use metered mail, because it is fraudulent.
- When dropping off your registered mail, always go inside the Post Office and:
- Mail it with the help of a postal worker, if you need them to tape the seams, etc..
- Deposit it on the counter with a postal worker, if everything is complete.
- In either case, do not use the outdoor blue USPS drop boxes which cannot receive registered mail or stamped mail exceeding 10 oz.
** The de facto government uses zip codes; American State Nationals do not. Context: in an effort to deceive Americans into believing they are citizens/subjects of the United States Corporation(***) – which has jurisdiction inside the city-state municipality Washington D.C. – the de facto uses zip codes. Zip codes are optional by law, but if a customer refuses to provide a zip code, often the USPS will use this as an excuse to delay delivery – obstruction of mail – which is a crime. (see article 740 below).
For more information, here is a video from the Ohio State Assembly, called “Communicating with the de facto”